Showing posts with label sewing. Show all posts

Tuesday, 16 April 2013

my birthday present

As I mentioned in a previous post, I was a very spoilt girl this birthday! My husband and my family pooled their resources and gave me my dream sewing machine!

IMG_6357

It’s so pretty and fancy and I never thought I’d own something like this. When Pete not so subtly asked me in the leadup to my birthday what I’d be looking for in a sewing machine, I said one that sews without skipping stitches, eating material, randomly snapping needles and actually does more stitches than just straight stitch.

IMG_6361

And he chose the Brother NX-400. This machine has nearly 300 stitch types, it threads itself, you can use it with our without a pedal, it has a whole bunch of different feet, including one for buttonholes, and which lets you actually sew a button on, it cuts the thread when you are finished sewing, you can lift the foot using a lever with your knee so you can leave your hands on the fabric, and you can even design and program your own stitches! I’m a little bit in love.

I’ve been a little addicted to playing with it and have done more sewing projects in the last week than I have in the last year! It’s so much fun to use, and it’s really got my creative juices flowing. I have so much awesome fabric stashed and I’m loving watching the pretty material turn into useful things right before my eyes.

Here are a few of the things I’ve been working on…

IMG_6362

A skirt for myself. I haven’t made myself clothes since I was pregnant with Mayana, and I love this one. I used the lovely heavy kind of linen fabric I’ve had stashed for a while. Love it!

IMG_6375

And of course I had to make Mayana one too! I absolutely love hers. I accidentally made it more high-waisted than I intended to but I’m glad I made that mistake because I LOVE how it turned out. And I also feel compelled to mention that I did not ask Mayana to pose that way, she came up with that all by herself…

IMG_6402

This was a gorgeous quilt panel that was given to me about three years ago. I had no idea what to do with it until I glimpsed a cute alphabet book on Pinterest and felt a flash of inspiration. I’m so happy with it! I love the colours and illustrations of this fabric, and I think this was a good use for it.

IMG_6510

And finally this little experiment. My first foray into proper patchwork. Also inspired by Pinterest (don’t you just love that place!). It’s a little bit wonky but I’m pretty proud of my first attempt. I really enjoyed doing this, and learned a lot along the way. I have an idea of what I’m going to do with it but I’m not totally sure just yet… you and I both will just have to wait and see!

So I am LOVING my new machine, and the world of possibilities it has opened up for me. I’m really enjoying creating so many things lately – not just sewing but crochet too. I’ll have to do a post about that sometime soon because I’ve been challenging myself a lot with designing things and making my own patterns and I’m really excited by it.

Do you have a creative outlet? I’m the sort of person who dabbles in just about anything, I’m not happy unless my hands are busy. What projects do you want to tackle next?

Friday, 13 July 2012

Make a Quilt!

Seriously, I have just finished a quilt for Reuben’s cot (which he’s moving into soon!) and I thought I’d show you how to do it so you can make one too! It’s the easiest quilt ever… if you can sew in a straight line then you can make it… and seriously it wouldn’t even matter if you couldn’t sew in a straight line, you could still make this quilt look good!

Also, as far as quilts go, it’s quite inexpensive to make, since it’s made completely from flannelette. So as far as I’m concerned, you have no excuse not to give this quilt a go!!

IMGP2917

I’ve made other quilts using this technique but always smaller. I have a rainbow one that I use with Reuben.. it goes everywhere with us and sits in the pram or highchair or on the ground for a playmat if we’re at a friend’s house. They’re soft and thick enough to be comfortable. They also wash and wear really well, because the more you wash them the better they look!

Okay. So the first thing you need to do is choose fabric. I got this cute cot panel with jungle animals a few months ago, and decided to chop it up for the purposes of a cute quilt. For this blanket, you need to cut out lots of squares, all of flannelette. The quilt is made of four layers. So make sure each of your patchwork squares is a stack of four layers.

IMGP2904

To be honest with you I didn’t even use a tape measure for the project. The size of my squares was based on the animal pictures from my original panel. The other blankets I have made had much smaller squares. You can do it however you want! And I ripped my fabric. I don’t usually do that because it makes your fabric fray (especially with flannelette) but in this quilt, that turns out to be a good thing, so go ahead, tear it. It feels good, doesn’t it? Okay. So make your stacks of squares, and lay out your quilt to get it into a design that you like. Now you start work on the squares. Half of your squares are going to have your fluffy, frayed design, and the other half are going to be plain. Obviously, I made my animal prints the plain ones, but like before, do what suits your fabric!

IMGP2905

For your plain squares, you want to sew across them, from corner to corner like a big X. This really is just to hold all of your layers together. You don’t want them to come apart. If you are using printed squares, choose a light coloured cotton that will blend in. If your squares are plain, you might like to choose a funky bright colour to make it part of your design.

IMGP2906

Your alternate squares are going to have the funky fluffy frayed look. To achieve this you have to follow a couple of steps. In all the other quilts I’ve made like this I’ve only used this diagonal idea. Basically, you need to sew straight lines about 1.5cm apart. They can be narrower or wider if you want, but you need to make sure you can fit your scissors in-between the lines.

IMGP2907

Because the next step is to cut in-between each of your sewed lines.

IMGP2908

For the love of God, please don’t cut straight through your square. You need to make sure that your bottom layer stays intact, you only want to be cutting through the top three layers. Otherwise, your whole square is going to end up in pieces, and you will probably end up in tears. Not that I’m speaking from experience or anything.

IMGP2909

Once you’re done, you’ll have a sore hand, and a square that looks something like this. See the pretty blue layers in-between showing through? Make sure that your inside layers are a nice contrasting colour, because you will see them.

IMGP2910

For this quilt I got a little shmancy and sewed some different designs in my fluffy squares. You can do pretty much any design you want, just remember that you need to be able to fit your scissors between the lines.

IMGP2911

Trippy huh?

IMGP2912

Next, lay out all your squares and get ready to sew them all together! I like labelling my squares, because I have a three year old who likes to rearrange things.

IMGP2913

Okay. Sewing together. The thing with the quilt is that you don’t want to hide your seams. They’re part of what makes the thing look so darn great. So when you piece your quilt together, the trick is to sew with the ‘wrong’ sides facing each other, and the ‘right’ sides out.

IMGP2914

You probably want to give about a 1.5cm seam allowance. Make sure you’re catching all of your layers, and try really hard not to let your cut strips bunch up or fold over.

I usually sew up each row, then sew the rows together. Make sure that you have your rows facing the right way up when you put them together, because there’s nothing more frustrating than having to unpick a row when you find you have an upside down giraffe. Again, not speaking from experience or anything!

IMGP2915

Ta da! Now there are only three more steps…. the first one is that you need to sew a ‘hem’ around the entire edge of your blanket. Not a real hem, this quilt is far too cool for boring things like hemming. Just sew a line about 1.5-2cm all the way around the edge of your blanket.

IMGP2916

Your second-last step is to do little snips around your ‘hem’. You want to cut about 1.5cm apart or so, and don’t cut into your hem line. This step just helps make the fraying on the outside not get too out of hand.

Your last step is to wash your blanket. Seriously, this is an important step, as it starts of the fraying process and makes your blanket look awesome. If you can put it through the dryer too, even better.

IMGP2917

And there you have it! You might like to tidy up some of your edges, and some of the longer strands on your frayed squares will need to be trimmed. This is seriously one of the easiest quilts you could make.

IMGP2918

{And in case you’re wondering this is what the back looks like}

Now, what are you waiting for?? Go sew!!

Friday, 9 December 2011

Handmade Goodies

I’m sure many of you remember my little foray into the handmade-business-world during my final year or so of uni. ‘Particularly Zoey’ kept me very busy, and gave me enough pocket money to feed my craft addictions without poor Pete pulling his hair out.

Unfortunately I’ve slowed things right off this year, working full time and trying to spend as many minutes with my lovely little family as possible when I’m not working has meant that something had to give.

However I’m on holidays now, and I have a small collection of little goodies for sale just in time for Christmas. I have big plans once maternity leave time arrives to revive my little business for real, and I can’t wait!

So please, if you have a few spare minutes stop by my facebook page and have a look. You can contact me here, or leave a comment on the item you would like if you wish to buy anything. I accept payments via PayPal or direct deposit.

Thank you for indulging me in my own little self-plug here!

Here’s a preview of a few of my goodies!

Particularly Zoey

Monday, 30 May 2011

scarfing!

Recently, Kim from petit pas did a guest post on my friend Talia’s blog. It was a tutorial on how to make your own t-shirt scarf, and I was inspired.

So today, I hit the op-shops and came across the perfect shirt, a very large jersey cotton men’s shirt with no side seams for $4.50, in red. Wonderful!

The project only took me about 10 minutes. I had to make a few changes to Kim’s tutorial though, because I have no sewing machine at the moment (the beautiful Husqvarna I’ve been baby-sitting for the past 4ish years has gone home to its Mama *sad*).

Whereas Kim cut the strips completely off, I left them all attached. So I cut to about half an inch off the edge. Then I cut a little strip off the left-over piece of t-shirt and tied and knotted it round and round the piece that was joining all of the strips:

IMGP9613

I’m happy with the finish, and no sewing! Easy peasy Smile

Here’s my brand new $4.50 cotton jersey scarf:

IMGP9610IMGP9611

I quite like it…

What do you think?

Monday, 23 May 2011

Point + Shoot: Getting My Craft On

I unearthed my crafting mojo this weekend. I whipped up two very cute handmade items, of which I am very proud:

IMGP9473

IMGP9474

This very cute cowgirl skirt for Mayana, complete with lace trim, very cute belt loops and the most gorgeous cowboy print panel.

IMGP9476

And this awesome pin cushion, which I love. I got a set of six of these very lovely brown cups and saucers for $2.00 at the Salvos. Cute idea, no?

Play along with Point + Shoot over at Sunny + Scout Smile It’s easy!

Thursday, 9 December 2010

Why I’ve Been So Absent…

I’ve been keeping myself very busy sewing. Selling. Buying more delicious fabric. Here’s a look at the things I’ve been whipping up in the last week-and-a-half. You can buy or order these through my facebook page, and there are a few goodies listed at my madeit store at the moment, too!

been sewing

Thursday, 28 October 2010

Back in Business

Now that uni days are behind me (have I mentioned that yet??), I can now do as much guilt-free sewing as I want!!!

And that means, that my little business is back up and running! I'm very excited about it, and I'm really hoping that LOTS of Christmas orders will keep me nice and busy over the next few months while I wait to see what happens in regards to teaching next year (Oh my goodness I'm a teacher now!!!)

I visited my favourite store yesterday, and stocked up on some lovely new materials especially for notebook'n'pencil sets and nappy wallets.


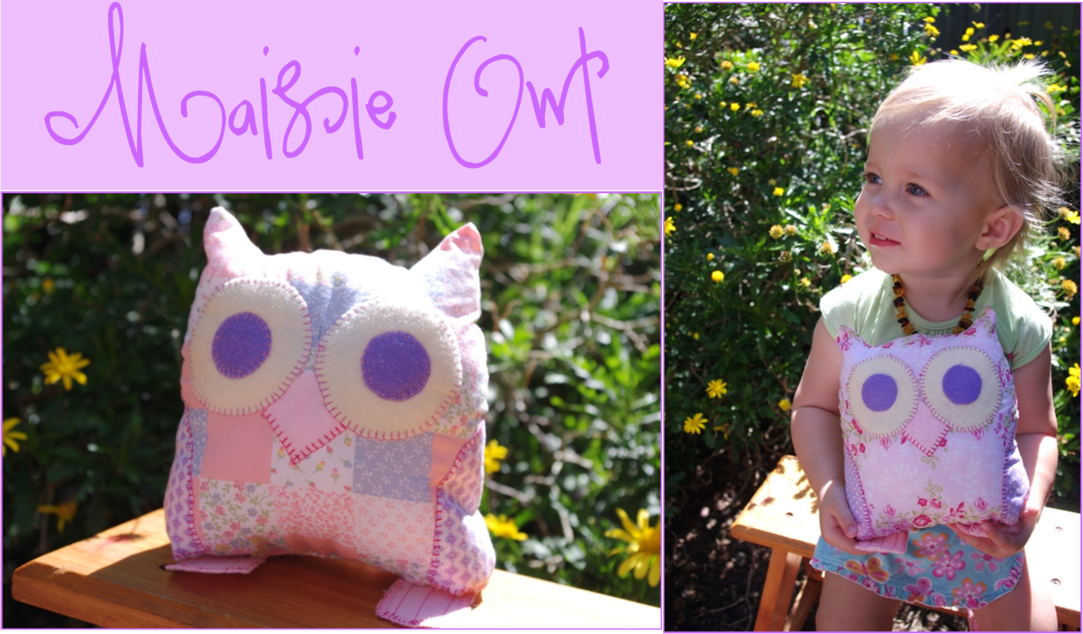
Then, last night, inspired by my owl-obsessed daughter, I created these:


Named after my girl, of course! I've never done much in the way of appliqué before, so I'm super happy with myself for how well they turned out. How cute! I'm selling them for $10.00 through my facebook page, and you can even choose your colours!

Bring on the Christmas orders!!!

Saturday, 2 October 2010

83 days…

Until Christmas! Can you believe it?

I love Christmas, pretty much everything about it makes me happy.

One of my favourite things to do at Christmas is decorate our house. I go all out, and there is always something Christmasy in almost every room of the house. This year, we won’t have a house at Christmas. In fact, in another 6 weeks, we’ll be homeless! (But I’m trying not to think about that).

Regardless, I couldn’t help myself, and when I saw the delicious Christmas prints at Spotlight, I had visions. And before I knew it, I had created my newest Christmas decoration…

IMGP5944  IMGP5946 IMGP5947 IMGP5948IMGP5949

And I’ve already asked Mum if I can hang it at her house… haha.

Did I mention how much I love Christmas?

Wednesday, 18 August 2010

Owl!! Hoo hoo!

That’s one of Mayana’s favourite things to say that the moment. She’s really into owls for some reason.

So when I came across this incredibly delicious fabric at Felix Loves Fabric’s eBay store I couldn’t resist.

I was so delighted when I received it, it’s so gorgeous. Mayana’s eyes completely lit up when she saw it, she wouldn’t let me put it back in the envelope! She spread it out on her lap and pointed at all the owls, saying “Owl. Hoo hoo! Pretty!!”. And she’s so right.

I have a few plans in mind for the different blocks, and tonight I’ve finished off plan number one.

IMGP5632

IMGP5633 I’ve appliquéd my favourite square to this t-shirt, and added a cute and frilly crocheted border. I think it sets off the gorgeous print perfectly, and I’m very happy that it turned out pretty much exactly how I imagined it.

I also made this t-shirt for Mayana tonight…

IMGP5635IMGP5636  I’ve done a lot of sewing lately, but it’s been a while since I’ve made something just for my girl, and I really enjoyed it. It was even worth the huge burn I’ve given the inside of my elbow with the iron (yeah, ouch!).

Keep an eye out for photos of my little cutie-patootie modelling these in the near future :)

Oh, and I have t-shirts similar to the second one available on my facebook page. I can also make to order, in almost any size (subject to availability!)

Sunday, 25 July 2010

I designed…

On special request from my cousin Jessica, I’ve come up with another new creation (I know, I’m on fire right?).

IMGP5347

This one is a nappy wallet…

When you first have a baby, you have a massive nappy bag full to the brim with so much *stuff* that you almost need a trolley to wheel it around. As time goes on, you come to realise that you don’t need half of what’s in that bag, and eventually your baby becomes a toddler who no longer needs the other half of what’s in the bag.

And carrying around a massive nappy bag with only a couple of nappies and some wipes is kind of annoying.

So the idea of this nappy wallet is that you can pop in two or three nappies, and a box of travel wipes and a disposable change mat, and put the whole handy package inside your handbag. 

IMGP5349

How handy is that?

They are made of a sturdy and durable and, most importantly, pretty fabric, and lined with flannelette (mostly because I had a LOT of it laying around spare).

IMGP5353 I’m selling these for $10.00 + $2.00 postage. I haven’t listed them at my madeit shop, because I’ve already generated a whole lot of interest on my facebook page, and that’s a cheaper place for me to sell from.

So, pop over to Particularly Zoey @ Facebook, and have a look! Don’t forget to become a ‘liker’.. we’re 13 fans off our very first give-away!!

Wednesday, 21 July 2010

I designed…

I have a new product at my made-it store, and I must say, I’m quite proud of this one.

It’s all about practicality, and I know other Mamas will like it because of that. I had the idea the other day when we were out and I couldn’t keep my little Mayana quiet. My little chicken loves to draw, and I knew that if only I had some kind of drawing implement with me, she’d be right!

Hence my new design…

IMGP5344 It’s a covered notebook with a built-in crayon pouch! It all folds up and attaches with a strip of velcro, and can be kept in your nappy bag or handbag for easy access.

IMGP5340 IMGP5338 Cute or what!?

I have a couple of these over at my madeit shop in different fabrics. I’m selling them for $15.00 and that’s including an A5 120 page art journal and 6 crayons.

So pop on over and have a look :) Oh and while you’re at it, go and become a fan of my facebook page. When I hit 100 ‘likers’, it’s time for Particularly Zoey’s very first giveaway!!

Friday, 26 March 2010

I so love to sew….

The sewing machine has taken up residence on our dining room table for the last couple of days. Partly because I can’t find space for it on my office desk (we’re tackling that monster tomorrow), and partly because it is easier to keep an eye on our roving Mayana Berry from the vantage point of our dining room table, which is right next to her play area – also known as our lounge-room.

So I wanted to make Mayana some new pretty things. The child has a million clothes, but only one skirt. Which is why I decided a skirt was the way to go. I had also procured a delicious brown corduroy with purple flowers (with the $10 voucher I got in the mail for being a Spotlight VIP member) that I had high hopes for. So once I got this idea in my head, I had to go through with it. I may or may not have sat up until some ridiculous hour on Wednesday night honing my pattern and cutting out material. By the way, I hate cutting out, it is the suckiest part of sewing by far! And I may or may not have sat up to a ridiculous hour last night, eventually producing not one but TWO cute little skirts for my cute little girl.

BUT…. really, there are FOUR gorgeous skirts!! You see, I got very clever with this pattern, and made it reversible! So each skirt is really 2-in-1! Now how’s that for good value!

So without any further ado… here are pictures of my adorable new, designed by me, super-cool two-in-one skirts!

SKIRT ONE

IMGP1748IMGP1750

SKIRT TWO

IMGP1752 IMGP1754

SKIRT THREE

IMGP1755IMGP1757

So what do you think!????

There is also plans for a lovely little number with a cutie-pie ladybug print on one side, and red with white polka-dots on the other. Just you wait!!!

By the way, the third skirt will soon be making it’s way to be listed on my made-it shop, as will the red one! So make sure you keep an eye out!

Now, I should probably go and put the sewing machine away so we can use our table for breakfast tomorrow!


Blog Template by YummyLolly.com